Wordy User Guide
Wordy is a native macOS menu bar text expander that monitors your keystrokes and automatically expands trigger phrases into replacement text.
Getting Started
Installation
- Download Wordy from getwordy.app
- Move Wordy to your Applications folder
- Launch Wordy
Granting Accessibility Permission
On first launch, Wordy will ask for Accessibility permission. This is required for Wordy to detect your typing across all applications.
- Click Open System Settings when prompted
- Navigate to Privacy & Security → Accessibility
- Enable Wordy in the list
- Return to Wordy—you're ready to go!
Keychain Access
On first launch, you may see a macOS prompt asking Wordy to access your Keychain. This is how Wordy securely stores your license key using macOS's built-in encryption. Just click Always Allow so you won't be asked again.
No data leaves your Mac — Keychain is the same secure storage that Safari uses for your passwords.
Creating Snippets
Basic Snippet Creation
- Click the Wordy icon in your menu bar
- Select Add New Snippet... (or press ⌘⇧N)
- Fill in the fields:
- Title: A descriptive name (e.g., "Email Signature")
- Trigger: The text you'll type to expand (e.g.,
;sig) - Replacement: The text that will be inserted
- Click Save (or press ⌘↩)
Tip: Use the Test button in the editor header to preview how your snippet expands before saving. For snippets with fill-in fields, it opens the fill-in form and shows the expanded result. Includes a Copy button to grab the output.
Tips for Triggers
- Use a prefix like
;or//to avoid accidental expansions - Keep triggers short but memorable
- Minimum 2 characters recommended
- Wordy warns you if a trigger is already in use
Organizing with Folders
Create folders to organize related snippets:
- Click the folder + button in the toolbar
- Name your folder
- Assign snippets to folders using the dropdown in the snippet editor
Right-click folders to rename, change color, or delete them.
Context-Aware Snippets
Snippets can adapt to the app you're typing in. Use App Scope to control where a snippet fires, and Per-App Variants to change what it expands into for each app — all from one snippet in your library.

App Scope
Every snippet can be restricted to fire only in selected apps, or blocked in selected apps. Open a snippet and find the App Scope card in the editor. You get three modes:
- Everywhere — the default. The snippet fires in any app.
- Only in these apps… — the snippet fires only in the apps you pick.
- Except in these apps… — the snippet fires everywhere except the apps you pick.
Picking apps
Click Add App… to open the app picker. It shows:
- Apps currently running on your Mac
- Your 10 most recently picked apps
- A Browse… button to pick any
.appfrom your Applications folder
The search field is focused automatically, so you can start typing right away.
Right-click shortcuts
Right-click any snippet in the list and open the Scope submenu for quick actions:
- Restrict to Current App — only fire in the app you were just using
- Block in Current App — fire everywhere except the app you were just using
- Reset to Everywhere — clear the scope
"Current app" is the last non-Wordy app you had focused, so the action targets the app you actually care about.
Note: Wordy never fires triggers inside its own editor, so you can safely type triggers while editing a snippet without triggering an expansion.
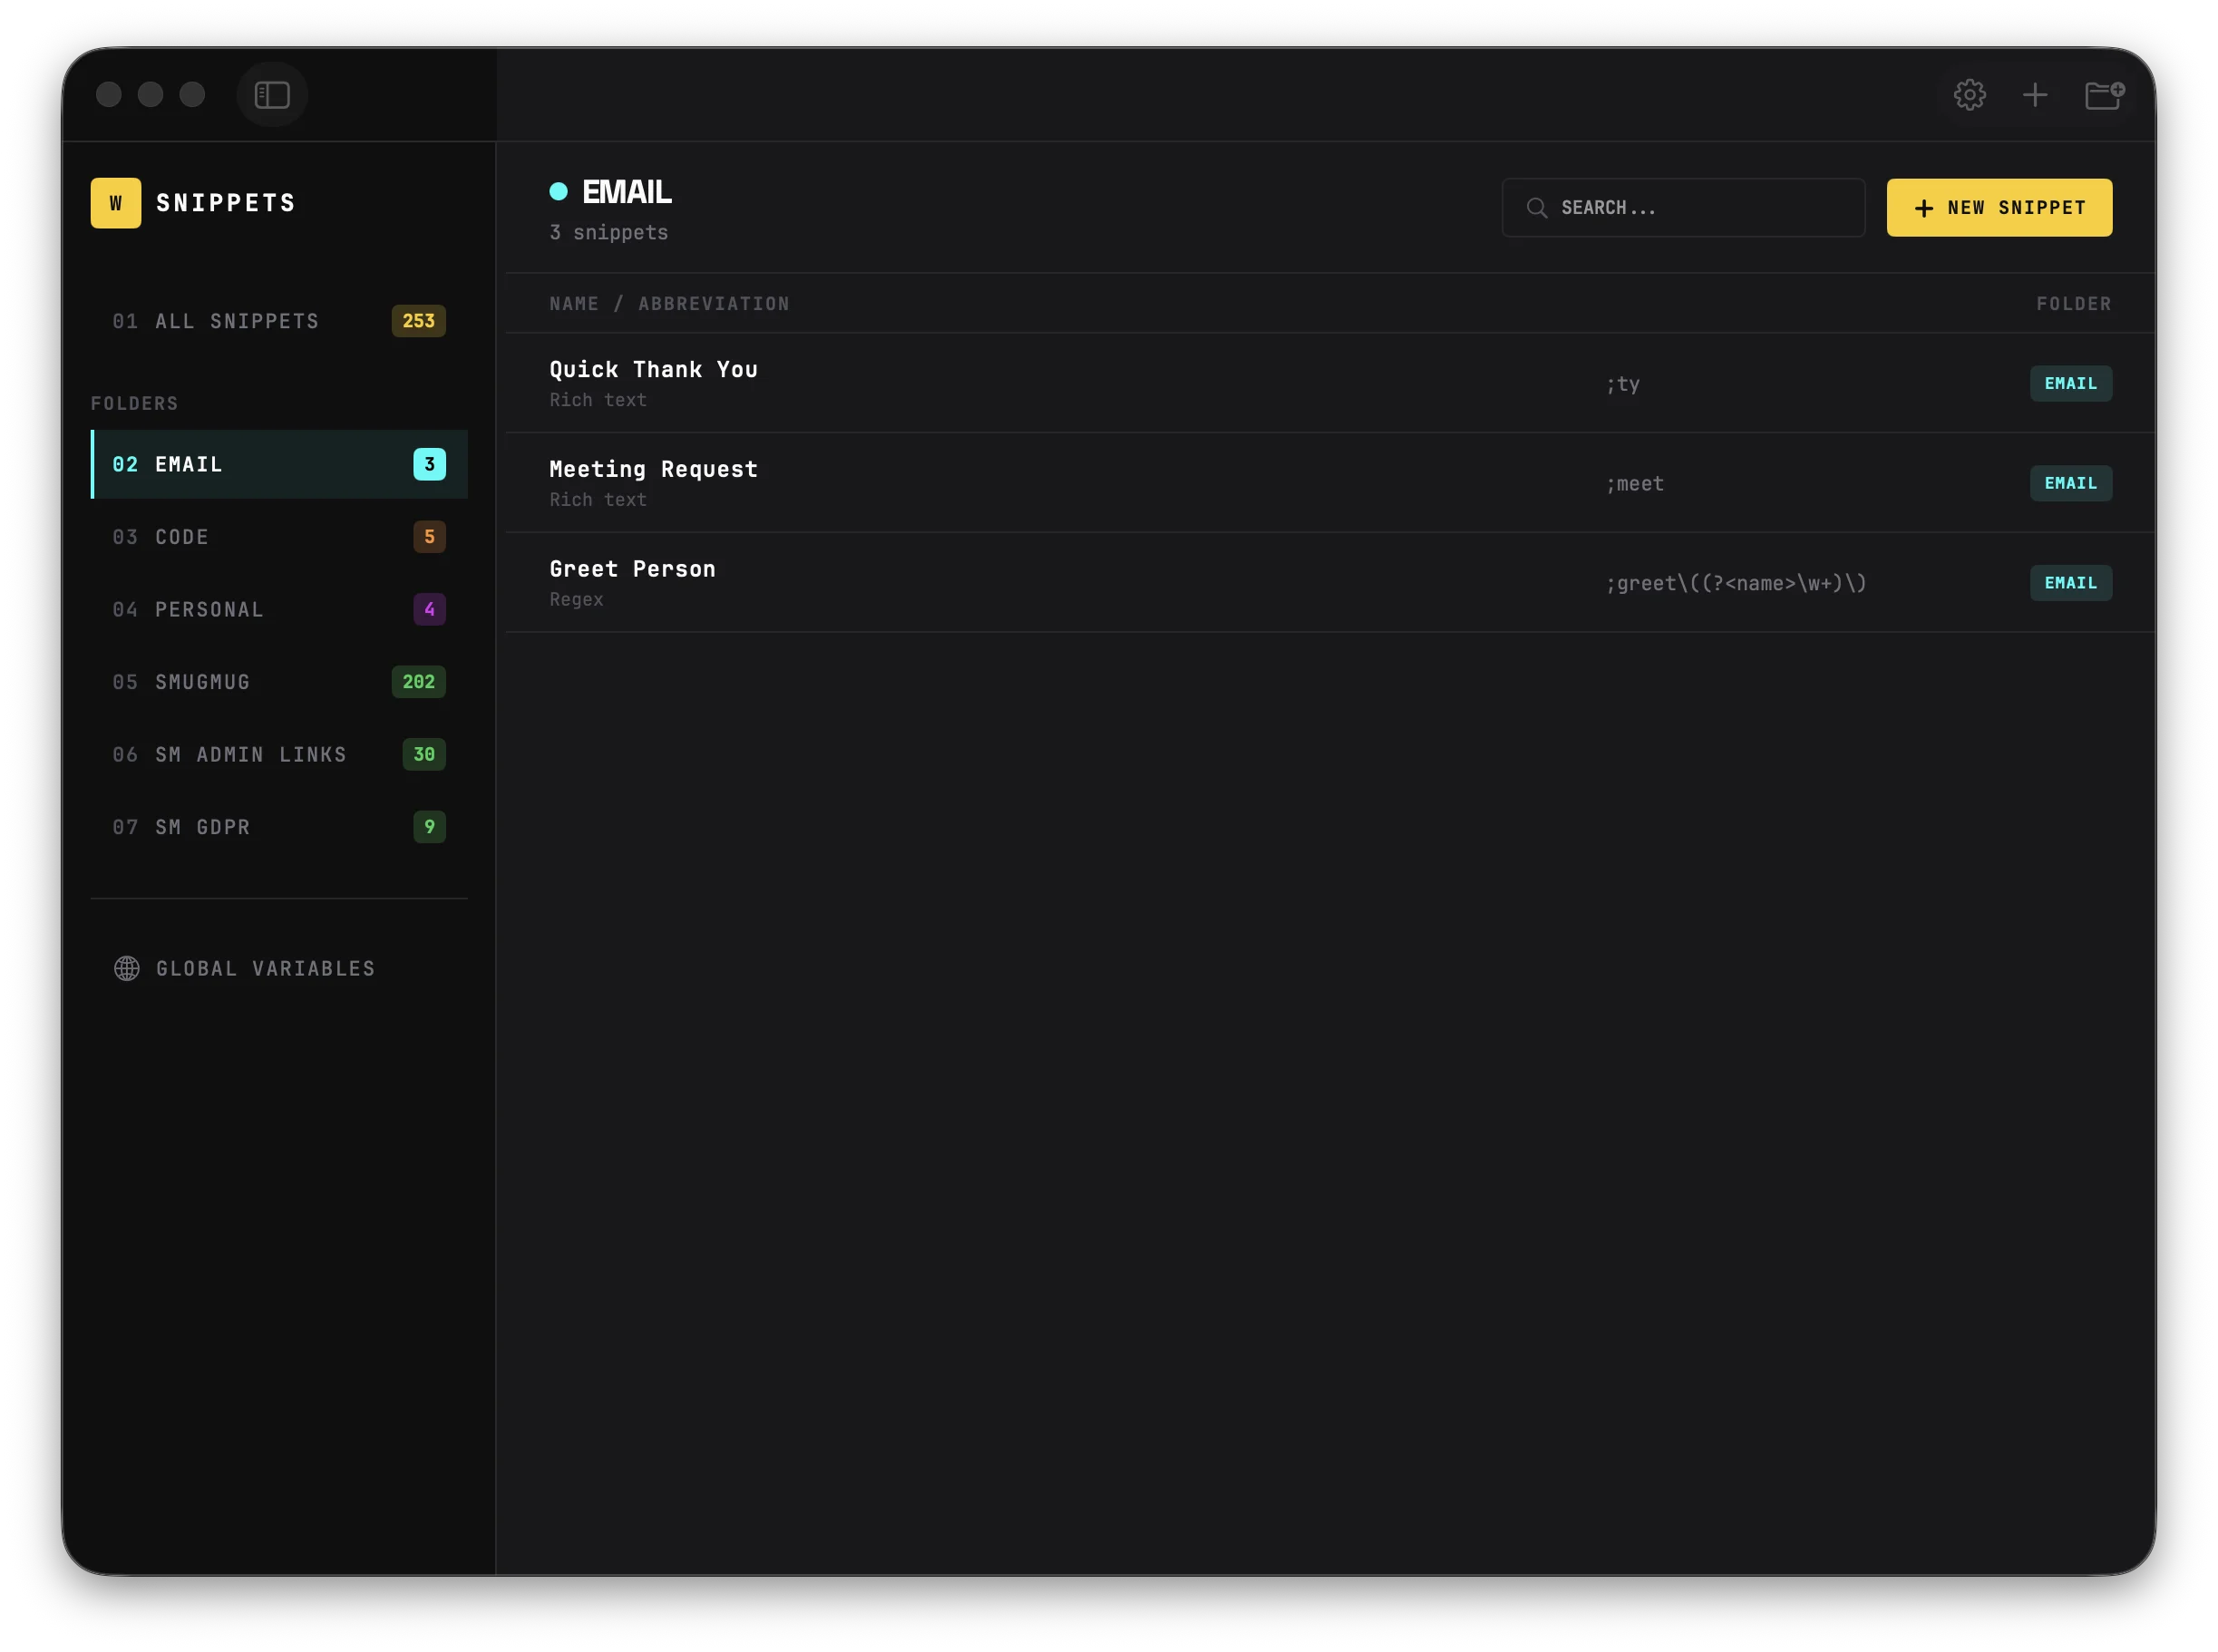
Reading scope in the snippet list
The snippet list has a dedicated Scope column (between Trigger and Folder) that summarizes scope at a glance — for example:
Mail only— restricted to MailMail +2— restricted to Mail plus two more apps (hover to see the full list)Except Terminal— blocked in Terminal, fires everywhere else- Blank — fires everywhere
Per-App Variants
A single snippet can expand to different replacement text depending on which app is frontmost. Type ;hi in Mail and get "Hey there, thank you for your email." Type the same ;hi in Slack and get "Hey Team." One snippet, one trigger — many tones.
Adding a variant
In the snippet editor, a tab bar sits above the replacement editor. You'll see a Default tab and a + button.
- Click the + button
- Pick an app from the picker
- A new tab appears, pre-filled with your Default text — tweak it for that app
- Save as usual
To remove a variant, click the × on its tab.
Tip: Click the ⓘ icon next to the Replacement label for a quick explainer of how variants work, right inside the app.
Graceful fallback
If you type the trigger in an app that doesn't have its own variant, Wordy uses the Default text. You only need variants for apps where the text should differ.
Version history
Edits to any variant are captured in snippet version history, so you can always roll back to an earlier version of any app's text. See Snippet Version History for details.
iCloud sync
Variants ride on the same iCloud sync as the rest of your snippets — configure once, they propagate to all your Macs. Variants for apps you don't have installed on a given Mac simply sit dormant until that app is present.
Using Scope and Variants Together
Scope and variants compose naturally. You can limit where a snippet fires and customize its text per app at the same time — for example, allow ;sig only in Mail and Slack, with a different signature in each.
When both are configured, the Scope column in the snippet list shows a combined summary, like Mail only · 2 variants.
Backwards-compatible: Existing snippets keep working exactly as before. Scope is blank by default (fires everywhere), and variants are opt-in per snippet. Nothing to migrate.
Regex Triggers
For power users, Wordy supports regular expressions as triggers. This lets you create dynamic triggers that capture parts of what you type and use them in the replacement.
Overview
Regular expression (regex) triggers let you create powerful, flexible shortcuts. Instead of a fixed trigger like ;sig, you can match patterns like ;hi(Alice) where "Alice" is captured and inserted into your replacement.
How to enable
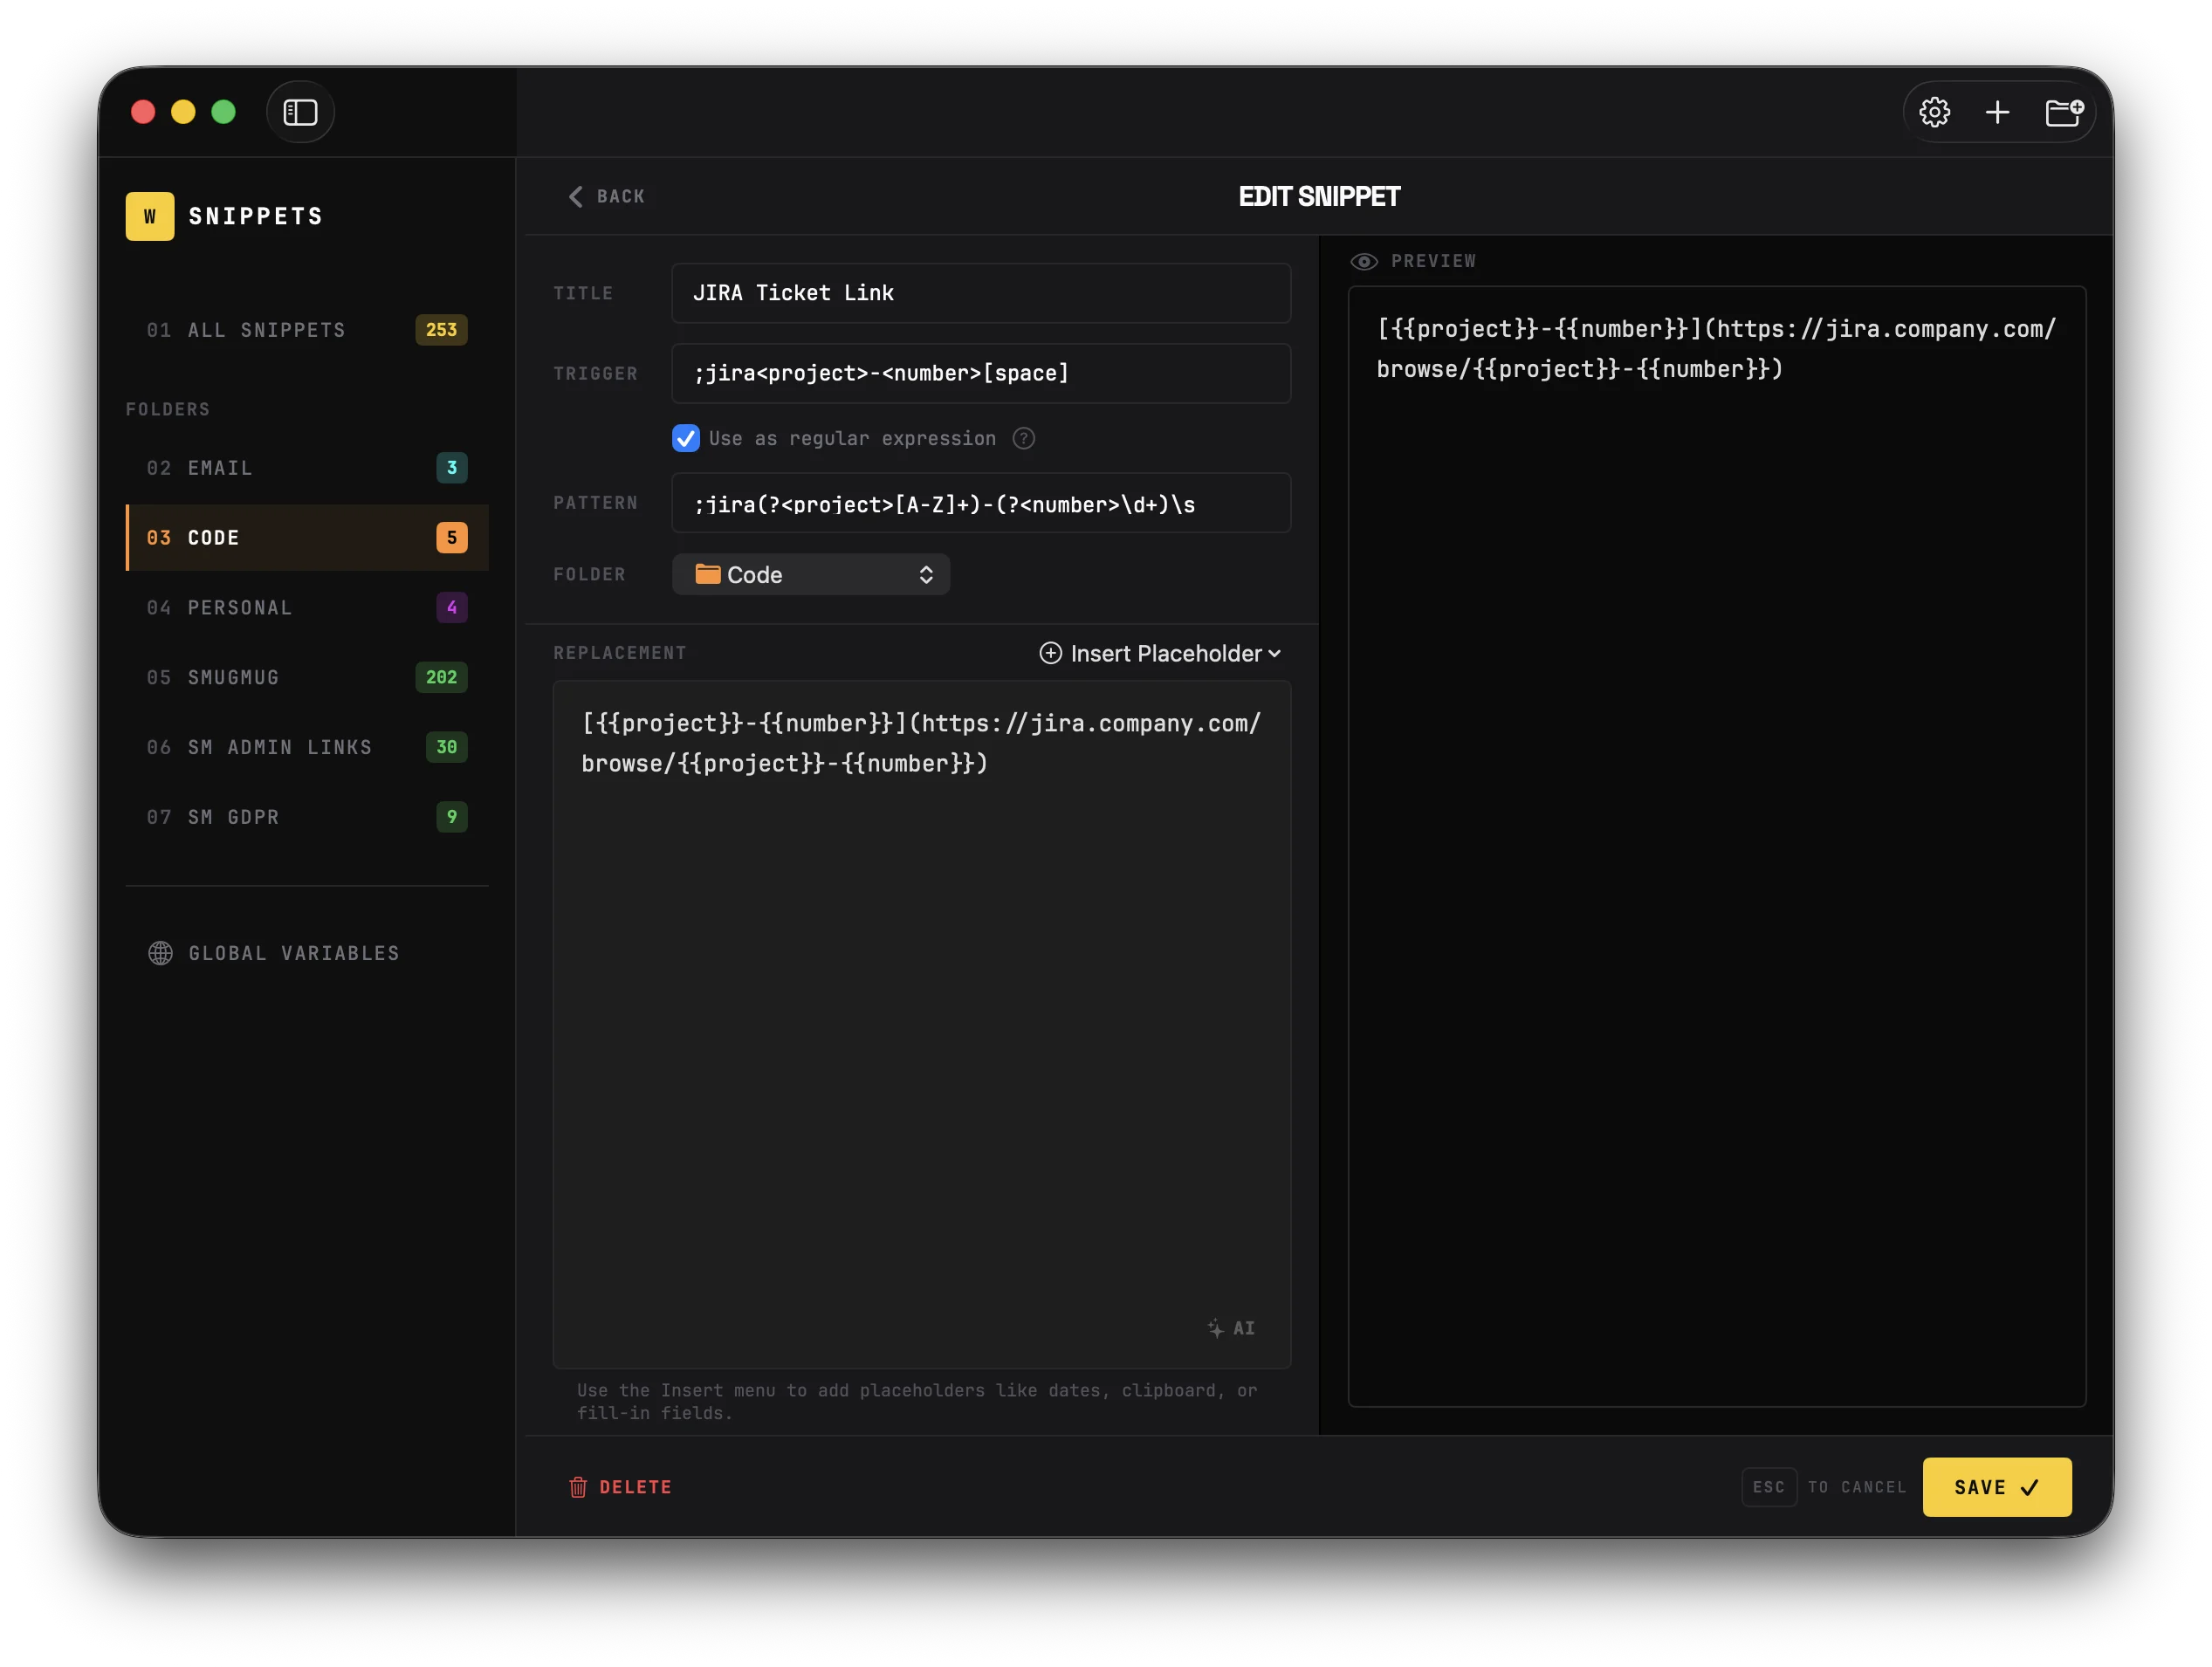
- Create or edit a snippet
- Check "Use as regular expression" below the trigger field
- The Trigger field shows what you'll type (e.g.,
;jira<project>-<number>[space]) - The Pattern field shows the actual regex with named capture groups
- Reference captures as
{{name}}in your replacement
Terminators
Patterns ending with + or * (like \d+ or \w+) fire as soon as the minimum match is found. To let you type the full value, add a terminator at the end:
Examples with space terminator
| Pattern | Trigger | Type this | Get this |
|---|---|---|---|
;jira(?<project>[A-Z]+)-(?<number>\d+)\s | ;jira<project>-<number>[space] | ;jiraPROJ-1234 (with space) | Jira link |
;gh(?<user>\w+)/(?<repo>\w+)\s | ;gh<user>/<repo>[space] | ;ghapple/swift | GitHub link |
;mail(?<user>\w+)\s | ;mail<user>[space] | ;mailjohn | john@company.com |
Common terminators
\s(space) — most natural, displays as[space]in the hint- Parentheses
)— when input is wrapped, e.g.,;hi\((?<name>\w+)\) - Semicolon
;or period.— when space wouldn't be natural
Important: Always add a terminator when your pattern ends with + or * — otherwise it fires too early.
Examples
Delimiter terminators
These patterns use parentheses, brackets, or other delimiters as natural terminators:
;hi(Sarah) → Hello Sarah!
;hi\((?<name>\w+)\)Hello {{name}}! ;tel(1-5551234) → +1 5551234
;tel\((?<code>\d+)-(?<num>\d+)\)+{{code}} {{num}} ;yt(dQw4w9WgXcQ) → Full YouTube URL
;yt\((?<id>[a-zA-Z0-9_-]+)\)https://youtube.com/watch?v={{id}} ;img(800x600) → <img width="800" height="600">
;img\((?<w>\d+)x(?<h>\d+)\)<img width="{{w}}" height="{{h}}"> ;rgb(255,128,0) → rgb(255, 128, 0)
;rgb\((?<r>\d+),(?<g>\d+),(?<b>\d+)\)rgb({{r}}, {{g}}, {{b}}) ;wrap(div) → <div>|</div> (cursor inside)
;wrap\((?<tag>\w+)\)<{{tag}}>{{cursor}}</{{tag}}> ;calc(5+3) → 5 + 3 = 8
;calc\((?<a>\d+)\+(?<b>\d+)\){{a}} + {{b}} = {{js:{{a}}+{{b}}}}Common Patterns
| Pattern | Matches |
|---|---|
\w+ | Letters, numbers, underscores |
\d+ | Numbers |
[a-zA-Z]+ | Letters only |
[a-zA-Z0-9_-]+ | URL-safe characters |
.+ | Any characters |
\s | Whitespace (space, tab, newline) |
Tips
- Escape special characters with
\(parentheses, brackets, etc.) - The pattern field uses syntax highlighting to help you read complex patterns:
- Yellow — capture group names (
ticketin(?<ticket>...)) - Teal — capture group syntax (
(?<...>and)) - Cyan — escape sequences (
\s,\d,\w, etc.) - Orange — character classes (
[A-Z],[0-9]) - Pink — quantifiers (
+,*,?)
- Yellow — capture group names (
- The trigger field shows validation errors for invalid patterns
- Regex triggers work with all other features (fill-ins, cursor, etc.)
- Use the Test button to preview expansion with placeholder capture group values
- Always add a terminator when your pattern ends with
+or*— otherwise it fires too early
Global Variables
Global variables let you define values once (like your name, company, or email) and use them across all your snippets. Unlike fill-in fields, global variables expand automatically—no popup form needed.
Setting Up Global Variables
- Click Global Variables in the sidebar (or from the menu bar)
- Click the + button to add a new variable
- Enter a Name (e.g.,
Name,Company,Email) - Enter the Value (e.g.,
John Smith,Acme Corp,john@example.com)
Variables are saved automatically as you type.
Using Global Variables in Snippets
Use the {{#VariableName}} syntax in your snippets:
| Placeholder | Output |
|---|---|
{{#Name}} | John Smith |
{{#Company}} | Acme Corp |
{{#Email}} | john@example.com |
Example: Email Signature
Best regards,
{{#Name}}
{{#Title}} | {{#Company}}
{{#Email}} | {{#Phone}}
Expands instantly to:
Best regards,
John Smith
Product Manager | Acme Corp
john@example.com | (555) 123-4567
Tips & Common Use Cases
- Variable names are case-insensitive (
{{#name}}={{#Name}}) - Undefined variables show as
[#VariableName?]to help you spot typos - Global variables sync with iCloud (if enabled)
Recommended Variables
| Variable | Example Value |
|---|---|
Name | Your full name |
FirstName | Your first name |
Company | Your company name |
Email | Your email address |
Phone | Your phone number |
Title | Your job title |
Address | Your mailing address |
Website | Your website URL |
Placeholders
Placeholders add dynamic content to your snippets. Insert them using the Insert Placeholder menu in the snippet editor.
Tip: For values like your name, email, and company that you use everywhere, see Global Variables — they auto-expand without any popup.
Date & Time
| Placeholder | Output |
|---|---|
{{date:short}} | 1/26/26 |
{{date:medium}} | Jan 26, 2026 |
{{date:long}} | January 26, 2026 |
{{time}} | 3:30 PM |
Date Math
Add or subtract time:
| Placeholder | Output |
|---|---|
{{date:+1d}} | Tomorrow's date |
{{date:-1d}} | Yesterday's date |
{{date:+1w}} | One week from now |
{{date:+1m}} | One month from now |
{{date:-1y}} | One year ago |
{{date:+1d:long}} | Tomorrow in long format |
Time Math
| Placeholder | Output |
|---|---|
{{time:+1h}} | One hour from now |
{{time:-30M}} | 30 minutes ago |
Units: d (days), w (weeks), m (months), y (years), h (hours), M (minutes)
Custom Date Formats
Use Unicode date format patterns for full control over date output:
| Placeholder | Output |
|---|---|
{{date:yyyy-MM-dd}} | 2026-01-29 |
{{date:HH:mm:ss}} | 14:30:45 |
{{date:yyyy-MM-dd'T'HH:mm:ss}} | 2026-01-29T14:30:45 |
{{date:EEEE}} | Wednesday |
{{date:MMMM d, yyyy}} | January 29, 2026 |
{{date:MMM yyyy}} | Jan 2026 |
{{date:E, d MMM}} | Wed, 29 Jan |
Combining with date math
| Placeholder | Output |
|---|---|
{{date:+1d:yyyy-MM-dd}} | Tomorrow in ISO format |
{{date:-1w:EEEE, MMMM d}} | Last week's day and date |
{{date:+1m:MMM yyyy}} | Next month |
Common format tokens
| Token | Meaning | Example |
|---|---|---|
yyyy | Year (4 digits) | 2026 |
yy | Year (2 digits) | 26 |
MMMM | Month name (full) | January |
MMM | Month name (short) | Jan |
MM | Month (2 digits) | 01 |
dd | Day (2 digits) | 29 |
d | Day | 29 |
EEEE | Weekday (full) | Wednesday |
EEE | Weekday (short) | Wed |
HH | Hour 24h (2 digits) | 14 |
hh | Hour 12h (2 digits) | 02 |
mm | Minute | 30 |
ss | Second | 45 |
a | AM/PM | PM |
Uses Unicode Date Format Patterns.
Clipboard
| Placeholder | Output |
|---|---|
{{clipboard}} | Current clipboard contents |
Text Transforms
| Placeholder | Output |
|---|---|
{{uppercase:hello}} | HELLO |
{{lowercase:HELLO}} | hello |
{{titlecase:hello world}} | Hello World |
Cursor Positioning
| Placeholder | Effect |
|---|---|
{{cursor}} | Places your cursor here after expansion |
Only the first {{cursor}} is used if multiple are present.
Counters
Auto-incrementing numbers that persist across sessions:
| Placeholder | Output |
|---|---|
{{counter:invoice}} | 1, 2, 3... (increments each use) |
{{counter:ticket:100}} | Starts at 100 if new |
{{counter:invoice:reset}} | Resets to 1 |
Each counter name is independent—use different names for different sequences.
Nested Snippets
Reuse other snippets inside your snippets:
| Placeholder | Effect |
|---|---|
{{snippet:sig}} | Inserts the snippet with trigger "sig" |
Supports up to 10 levels of nesting. Circular references are detected and prevented.
JavaScript Expressions
Run JavaScript code in your snippets:
| Placeholder | Output |
|---|---|
{{js:1+1}} | 2 |
{{js:Math.PI.toFixed(2)}} | 3.14 |
{{js:random(1,100)}} | Random number 1-100 |
{{js:uuid()}} | Generated UUID |
Available helpers
now()— Current date and timetoday()— Current datetime()— Current timerandom(min, max)— Random integeruuid()— Generate UUID
Shell Commands
Run shell commands and insert their output:
| Placeholder | Output |
|---|---|
{{shell:whoami}} | Your username |
{{shell:date +%s}} | Unix timestamp |
{{shell:git branch --show-current}} | Current git branch |
{{shell:echo "Hello, World!"}} | Hello, World! |
{{shell:python3 -c "print(2**10)"}} | 1024 |
{{shell:hostname}} | Your Mac's hostname |
{{shell:sw_vers -productVersion}} | macOS version |
Details
- Commands run via
/bin/zshas the current user - 5-second timeout — commands that take longer return
[Shell Timeout] - Failed commands return
[Shell Error]or[Shell Error: message] - Trailing newlines are automatically trimmed from output
Open URL / App / File
Open URLs, launch apps, or open files as a side effect of snippet expansion. The placeholder resolves to an empty string — it performs the action without inserting any text.
| Placeholder | Effect |
|---|---|
{{open:https://google.com}} | Opens a URL in your default browser |
{{open:/Applications/Calculator.app}} | Launches an app |
{{open:~/Documents/report.pdf}} | Opens a file in its default app |
Dynamic URLs with nested placeholders
Combine with other placeholders to build URLs dynamically:
{{open:https://jira.com/browse/{{clipboard}}}}This opens a Jira ticket based on your clipboard contents.
Details
- Opens via macOS — works with
https://URLs, file paths, and.appbundles - Resolves to an empty string — combine with text insertion or use standalone
- Multiple
{{open:...}}per snippet allowed - Tilde paths (
~/Documents/...) are expanded automatically - Works with fill-in forms, quick search, and direct expansion
- Available in the Insert Placeholder menu under Advanced → "Open URL / Path..."
- Syntax highlighted in brown in the snippet editor
Example: Open a URL and insert text
Ticket {{clipboard}} opened in browser.
{{open:https://jira.com/browse/{{clipboard}}}}
This inserts a confirmation message and opens the Jira ticket — all from a single snippet.
Fill-in Fields
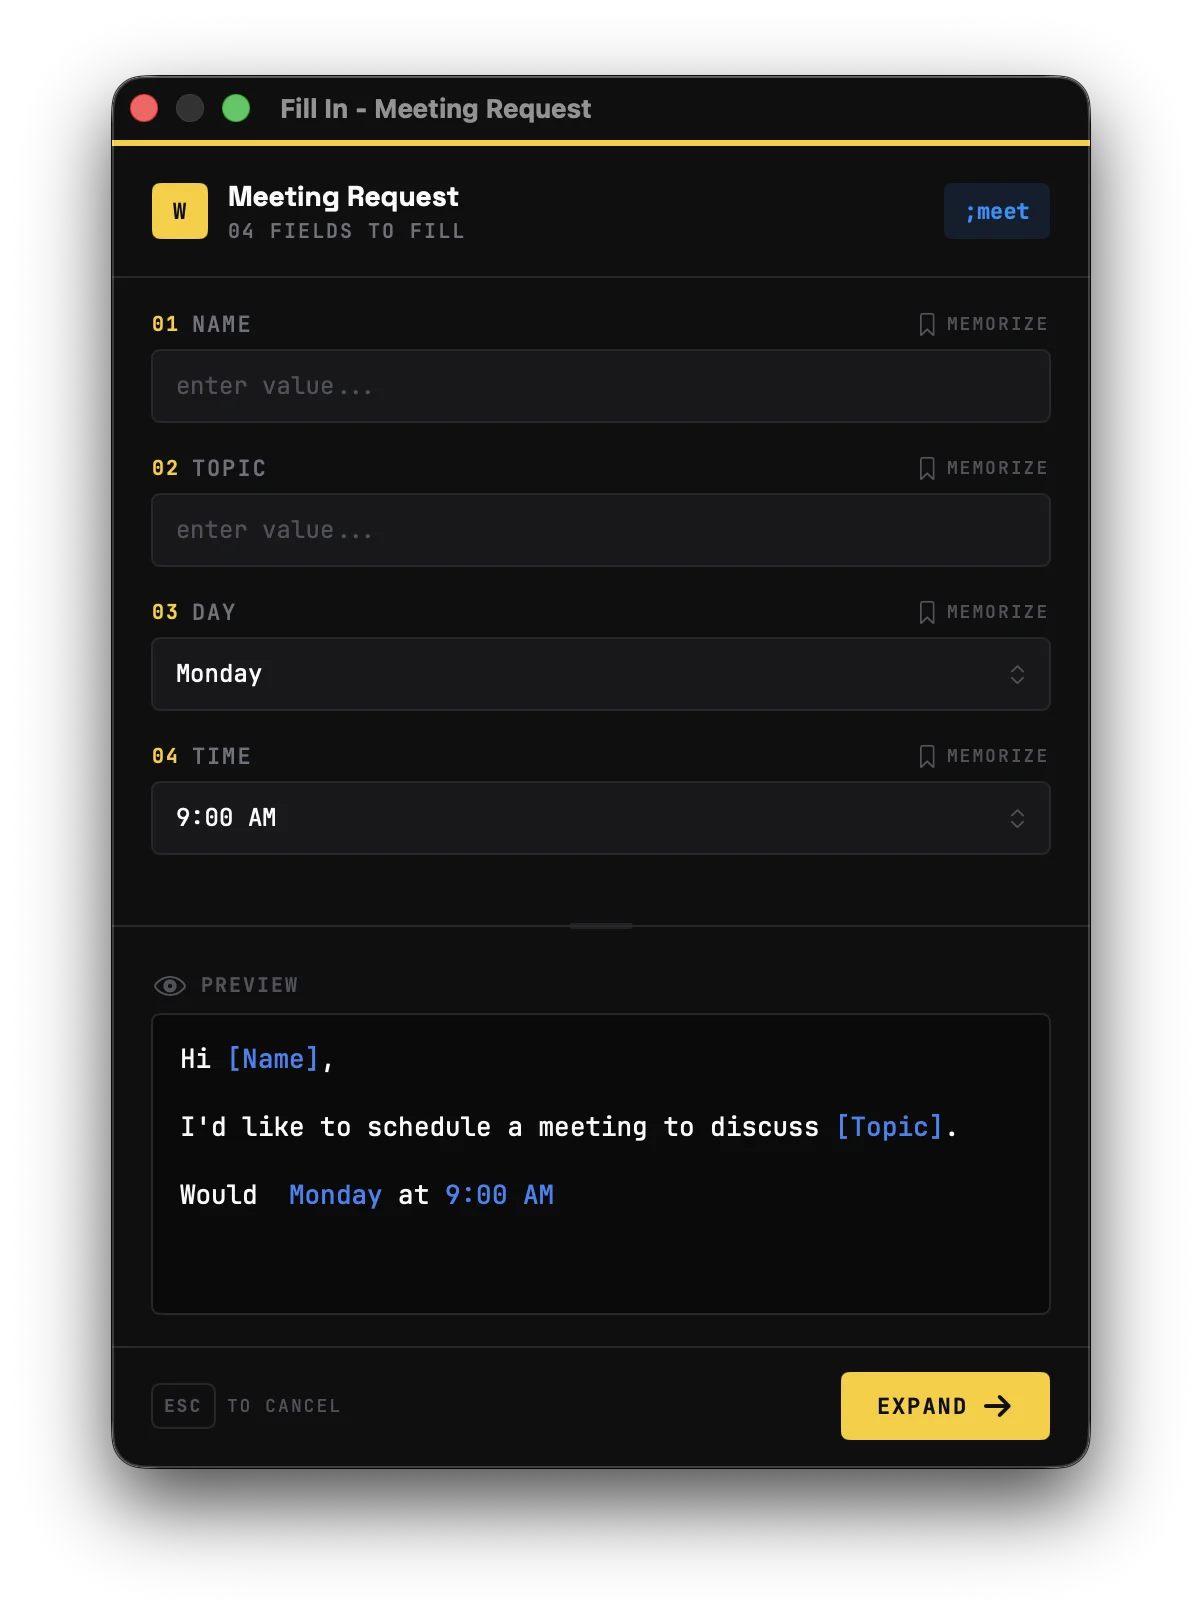
Fill-in fields create an interactive form that appears when you expand the snippet, letting you customize the output each time.
Text Field
{{field:Name}}
{{field:Name:John}}           // With default value
{{field:Name::required}}      // Required field
{{field:Name:John:required}}  // Default + required
Multiline Text Field
{{textarea:Notes}}
{{textarea:Notes:Enter details here}}
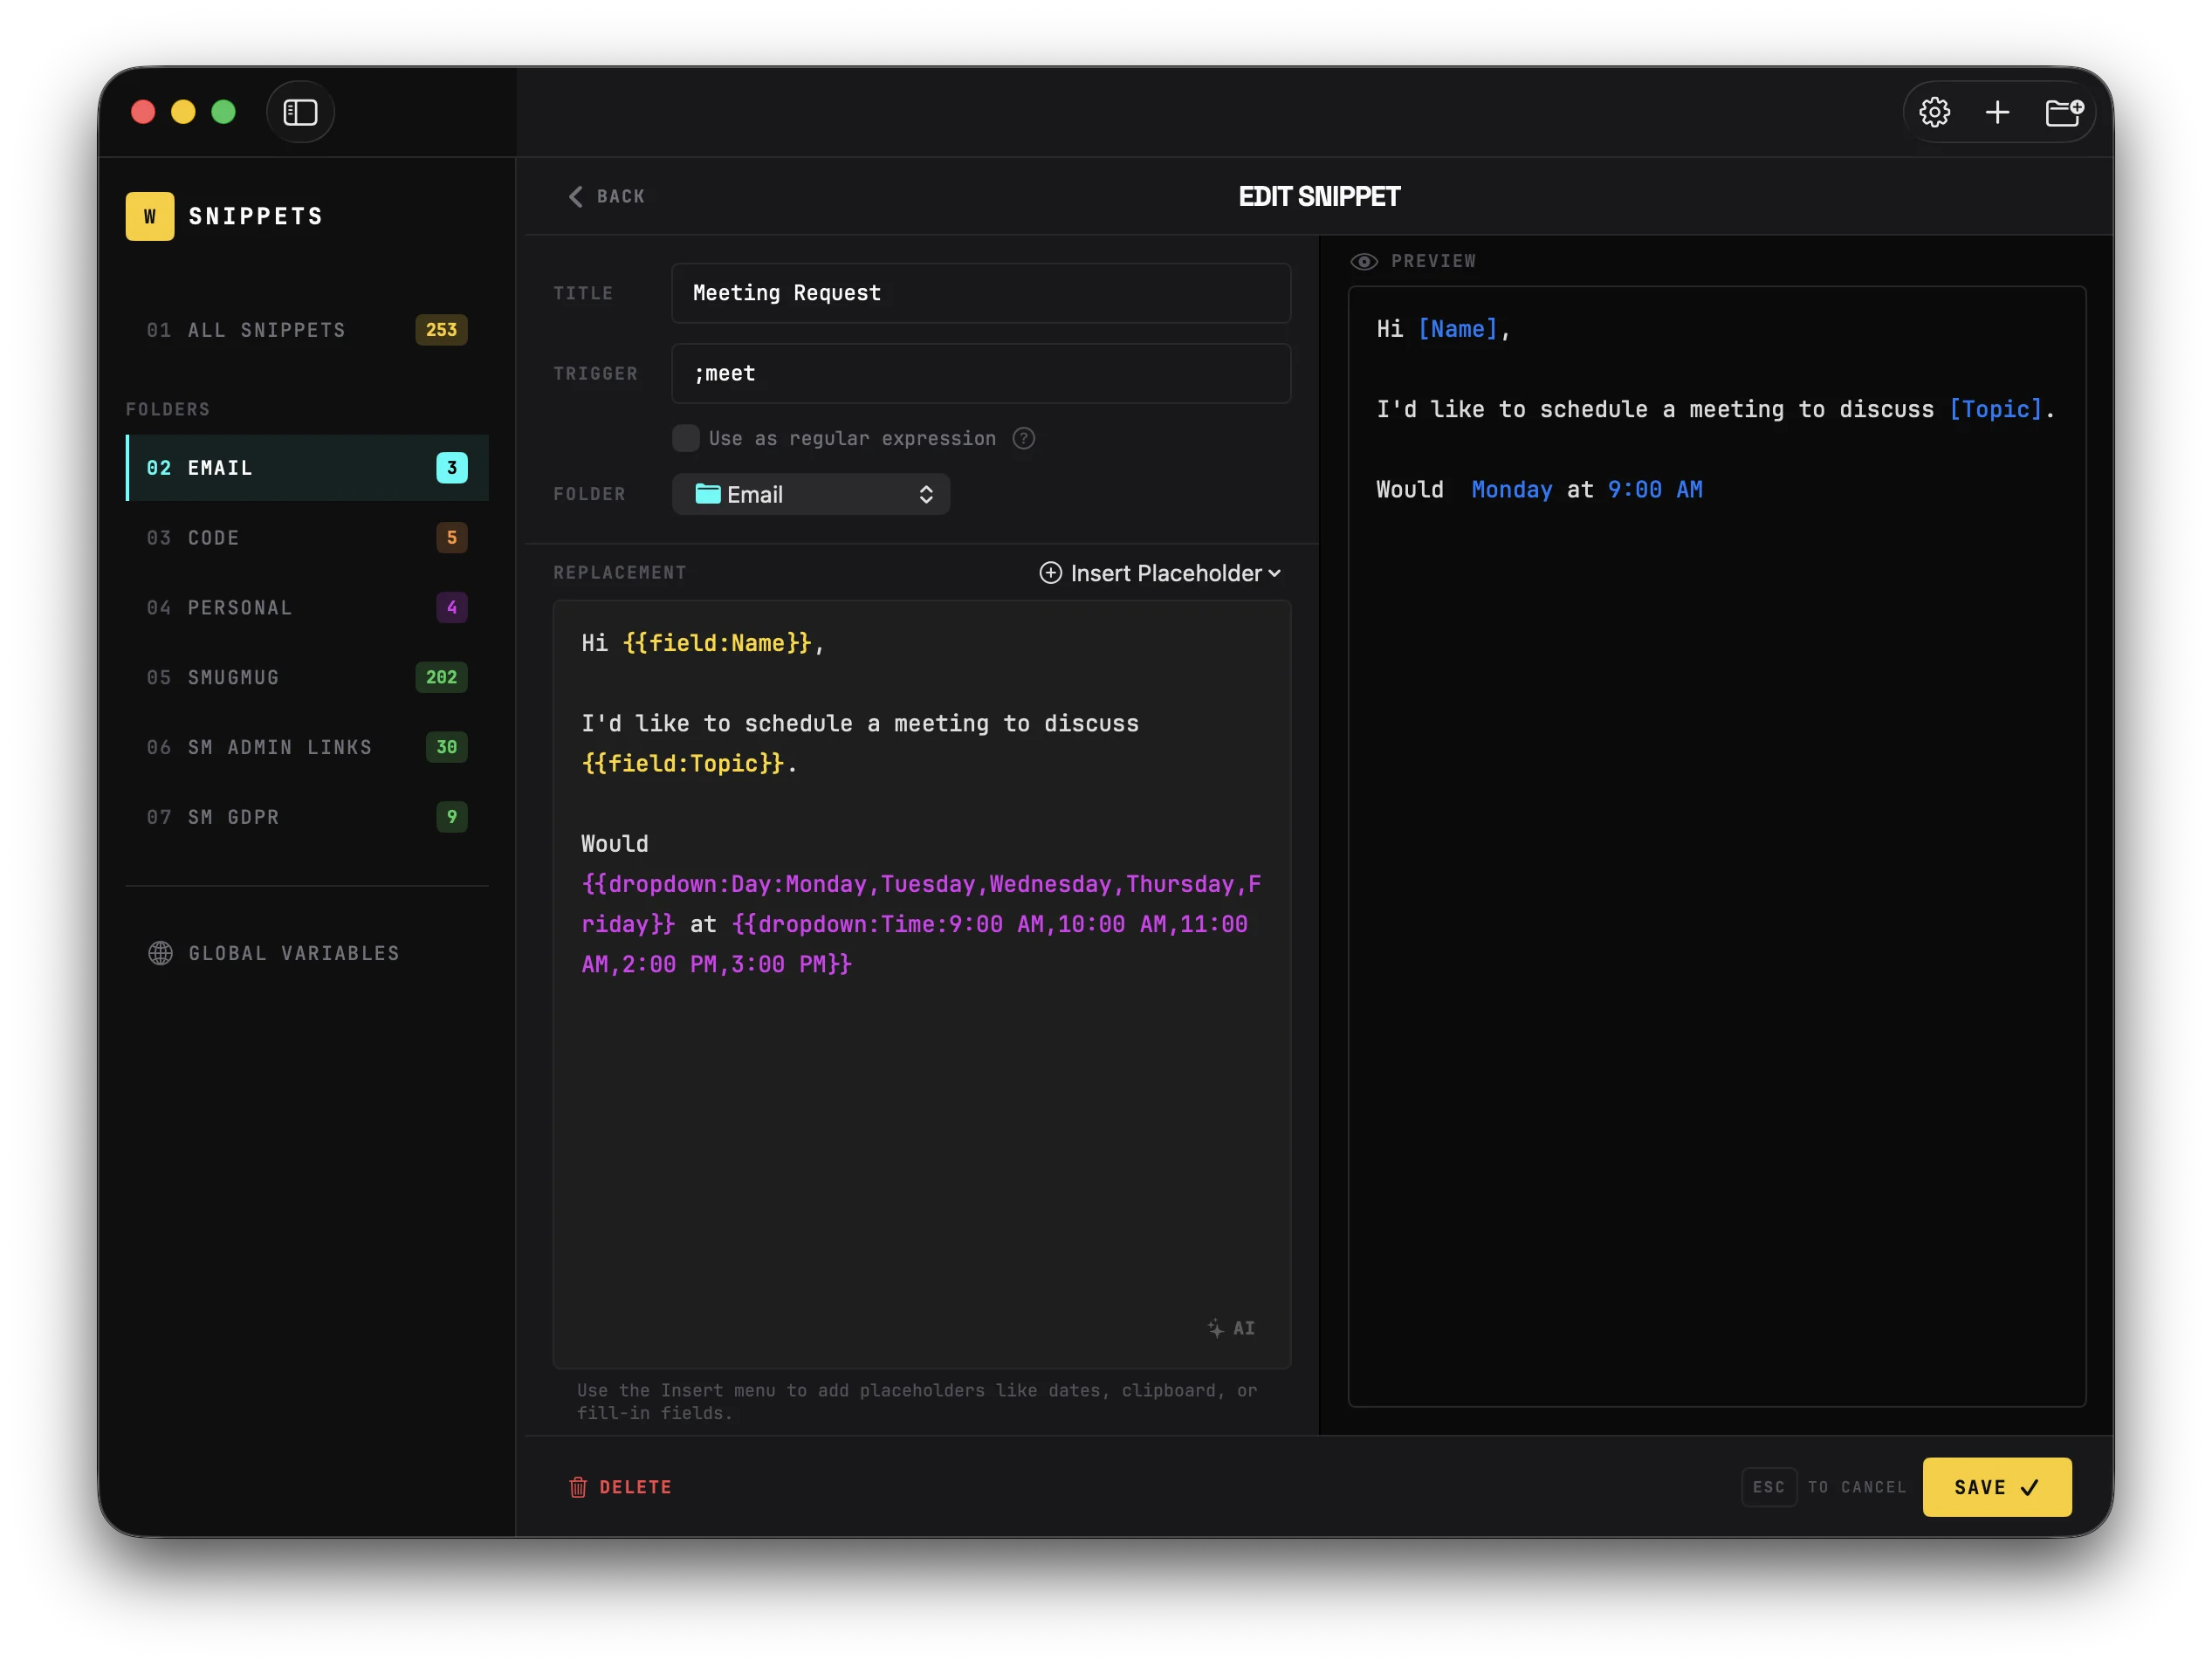
{{textarea:Notes::required}}Dropdown
{{dropdown:Priority:High,Medium,Low}}
{{dropdown:Status:Draft,Review,Published:required}}
Options are comma-separated. The first option is selected by default.
Optional Sections
Include or exclude content based on a checkbox:
{{?:Include Greeting}}Hello {{field:Name}},

{{/?}}Here is the information you requested...
When expanded, you'll see a checkbox. Uncheck it to remove that section entirely.
Date Picker
Show a graphical calendar in the fill-in form for date selection:
{{datepicker:Due Date}}
{{datepicker:Birthday:yyyy-MM-dd}}              // Custom date format
{{datepicker:Start Date::required}}              // Required field
{{datepicker:Deadline:MMMM d, yyyy:required}}    // Format + required
When expanded, the form shows a native macOS calendar picker instead of a text field. The selected date is formatted according to the specified format (or medium date style like "Feb 15, 2026" if no format is given).
Tips
- Use any Unicode date format pattern (same as Custom Date Formats above)
- The date picker defaults to today's date
- Great for meeting notes, invoices, contracts, and any snippet that references a specific date
Notes
Display read-only information in the fill-in form that won't appear in the final output:
{{note:Send to: john@example.com (sales), jane@example.com (support)}}Notes are useful for:
- Reference information you might want to copy (email addresses, phone numbers)
- Instructions or reminders when filling out the form
- Context that helps you fill in the other fields
How notes work
- Displayed in the fill-in form with an info icon
- Text is selectable so you can copy it
- Completely stripped from the final expanded output
- Shown as italic gray text in the editor preview
Example
{{note:Contacts: alice@example.com (urgent), bob@example.com (general)}}

Dear {{field:Recipient}},

Thank you for contacting {{dropdown:Department:Sales,Support,Billing}}.

{{textarea:Message}}

Best regards
When expanded, the form shows the email addresses for reference at the top, but the final output contains only the filled-in message.
Remembering Field Values
Each fill-in field has a Remember checkbox. When checked, Wordy saves that field's value for next time.
How it works
- Expand a snippet with fill-in fields
- Enter your values
- Check Remember next to fields you want to save
- Click Expand
Next time you use that snippet (or any snippet with the same field name), the field will be pre-filled with your remembered value.
Tips
- Remembered values are per-field name, not per-snippet (so
{{field:Email}}shares its value across all snippets) - Uncheck "Remember" and expand with a new value to update the saved default
- Use this feature for values that change occasionally but not every time (e.g., project names, client names)
Combining Global Variables and Fill-in Fields
Global variables and fill-in fields work great together. Use global variables for values that never change, and fill-in fields for values you customize each time.
Example: Sales Outreach Email
Hi {{field:Recipient}},

Thank you for your interest in {{#Company}}.

{{?:Include meeting request}}I'd love to schedule a call to discuss further.
You can reach me at {{#Email}} or {{#Phone}}.

{{/?}}Best regards,
{{#Name}}
{{#Title}}
When expanded:
{{#Company}},{{#Email}},{{#Phone}},{{#Name}}, and{{#Title}}auto-fill from your global variables- Only the
{{field:Recipient}}field and the checkbox appear in the form
Example: Meeting Follow-up
Hi {{field:Name}},

Thank you for meeting with me {{dropdown:When:today,yesterday,last week}}.

{{?:Action Items}}Action items:
{{textarea:Items}}

{{/?}}{{?:Schedule Follow-up}}Let's schedule a follow-up for {{date:+1w:long}}.

{{/?}}Best regards,
{{#Name}}
AI Snippet Generation
Wordy can use Claude AI to create new snippets or improve existing ones. Describe what you need in plain English and Wordy generates the trigger, replacement text, and placeholders automatically.
Setup
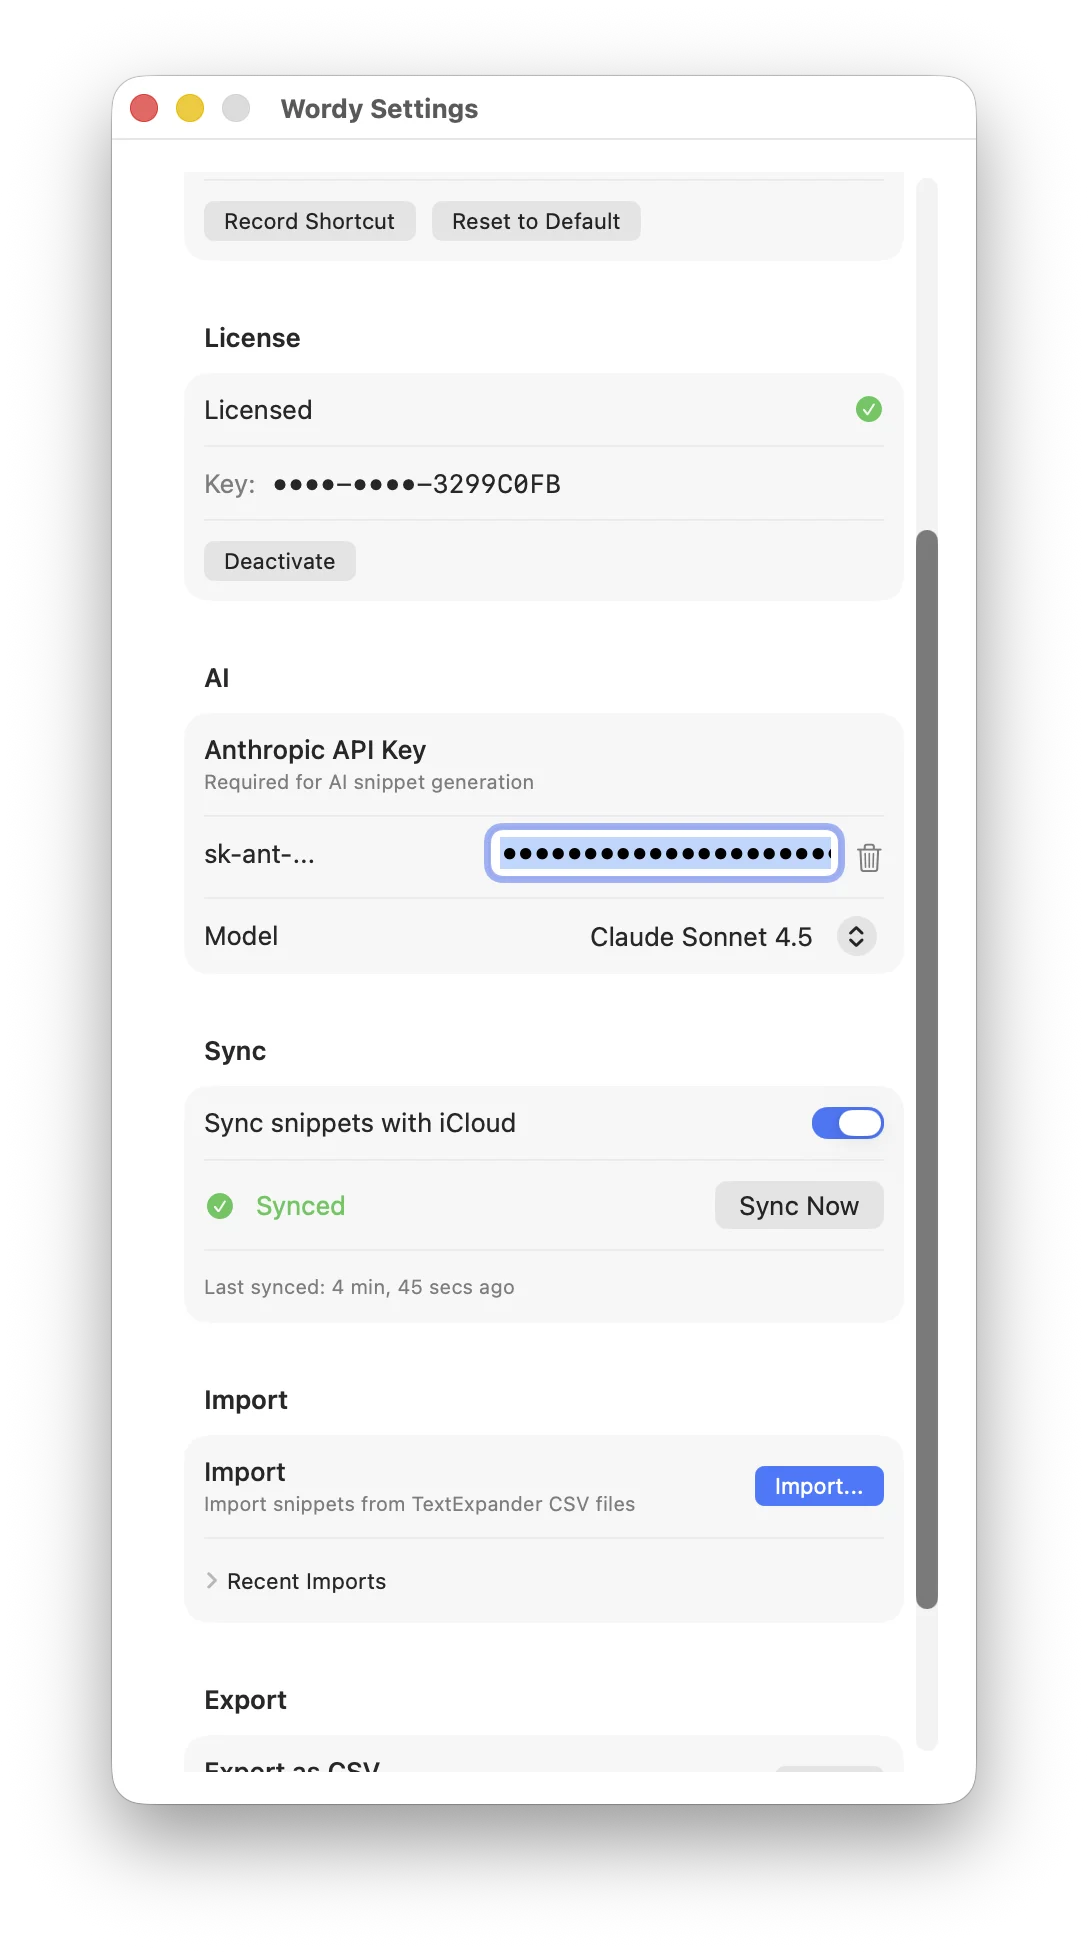
To enable AI features, you'll need an Anthropic API key:
- Go to Settings → AI
- Enter your Anthropic API key (get one at console.anthropic.com)
- Choose a model:
- Claude Sonnet 4.5 (default) — best quality, recommended for most users
- Claude Haiku 4.5 — faster responses, lower cost
- The AI buttons appear in the snippet editor once a key is saved
To remove AI features entirely, click the trash icon next to your API key in Settings. The AI buttons will disappear.
Create with AI
Use this to generate a new snippet from a natural language description.
- Open a new or existing snippet in the editor
- Click the sparkles button ("Create with AI") next to the Insert menu
- Describe what you want in the prompt field
- Click Generate
- Review the suggestion — title, trigger, replacement, and regex status are all shown
- Click Apply to use it, Refine to edit your prompt and regenerate, or Discard to cancel
Example prompts
| Prompt | What Claude generates |
|---|---|
| "Email signature with fill-in fields for name, title, and phone" | A snippet with {{field:Name}}, {{field:Title}}, {{field:Phone}}, and {{cursor}} |
| "Polite follow-up email with an optional action items section" | A snippet using {{field:Recipient}}, {{dropdown:When:today,yesterday,last week}}, and {{?:Action Items}} |
| "Insert today's date in ISO format" | A simple snippet with trigger ;iso and replacement {{date:yyyy-MM-dd}} |
| "Git commit message with type dropdown and scope field" | A snippet with {{dropdown:Type:feat,fix,docs,refactor,test}}, {{field:Scope}}, and {{field:Description::required}} |
| "Generate a UUID" | A snippet with trigger ;uuid and replacement {{js:uuid()}} |
| "Invoice number that auto-increments, starting from 1000" | A snippet using {{counter:invoice:1000}} |
| "Jira ticket link where I type the ticket number" | A regex trigger like ;jira\((?<num>\d+)\) with replacement https://jira.company.com/browse/PROJ-{{num}} |
| "Current git branch name" | A snippet with trigger ;branch and replacement {{shell:git branch --show-current}} |
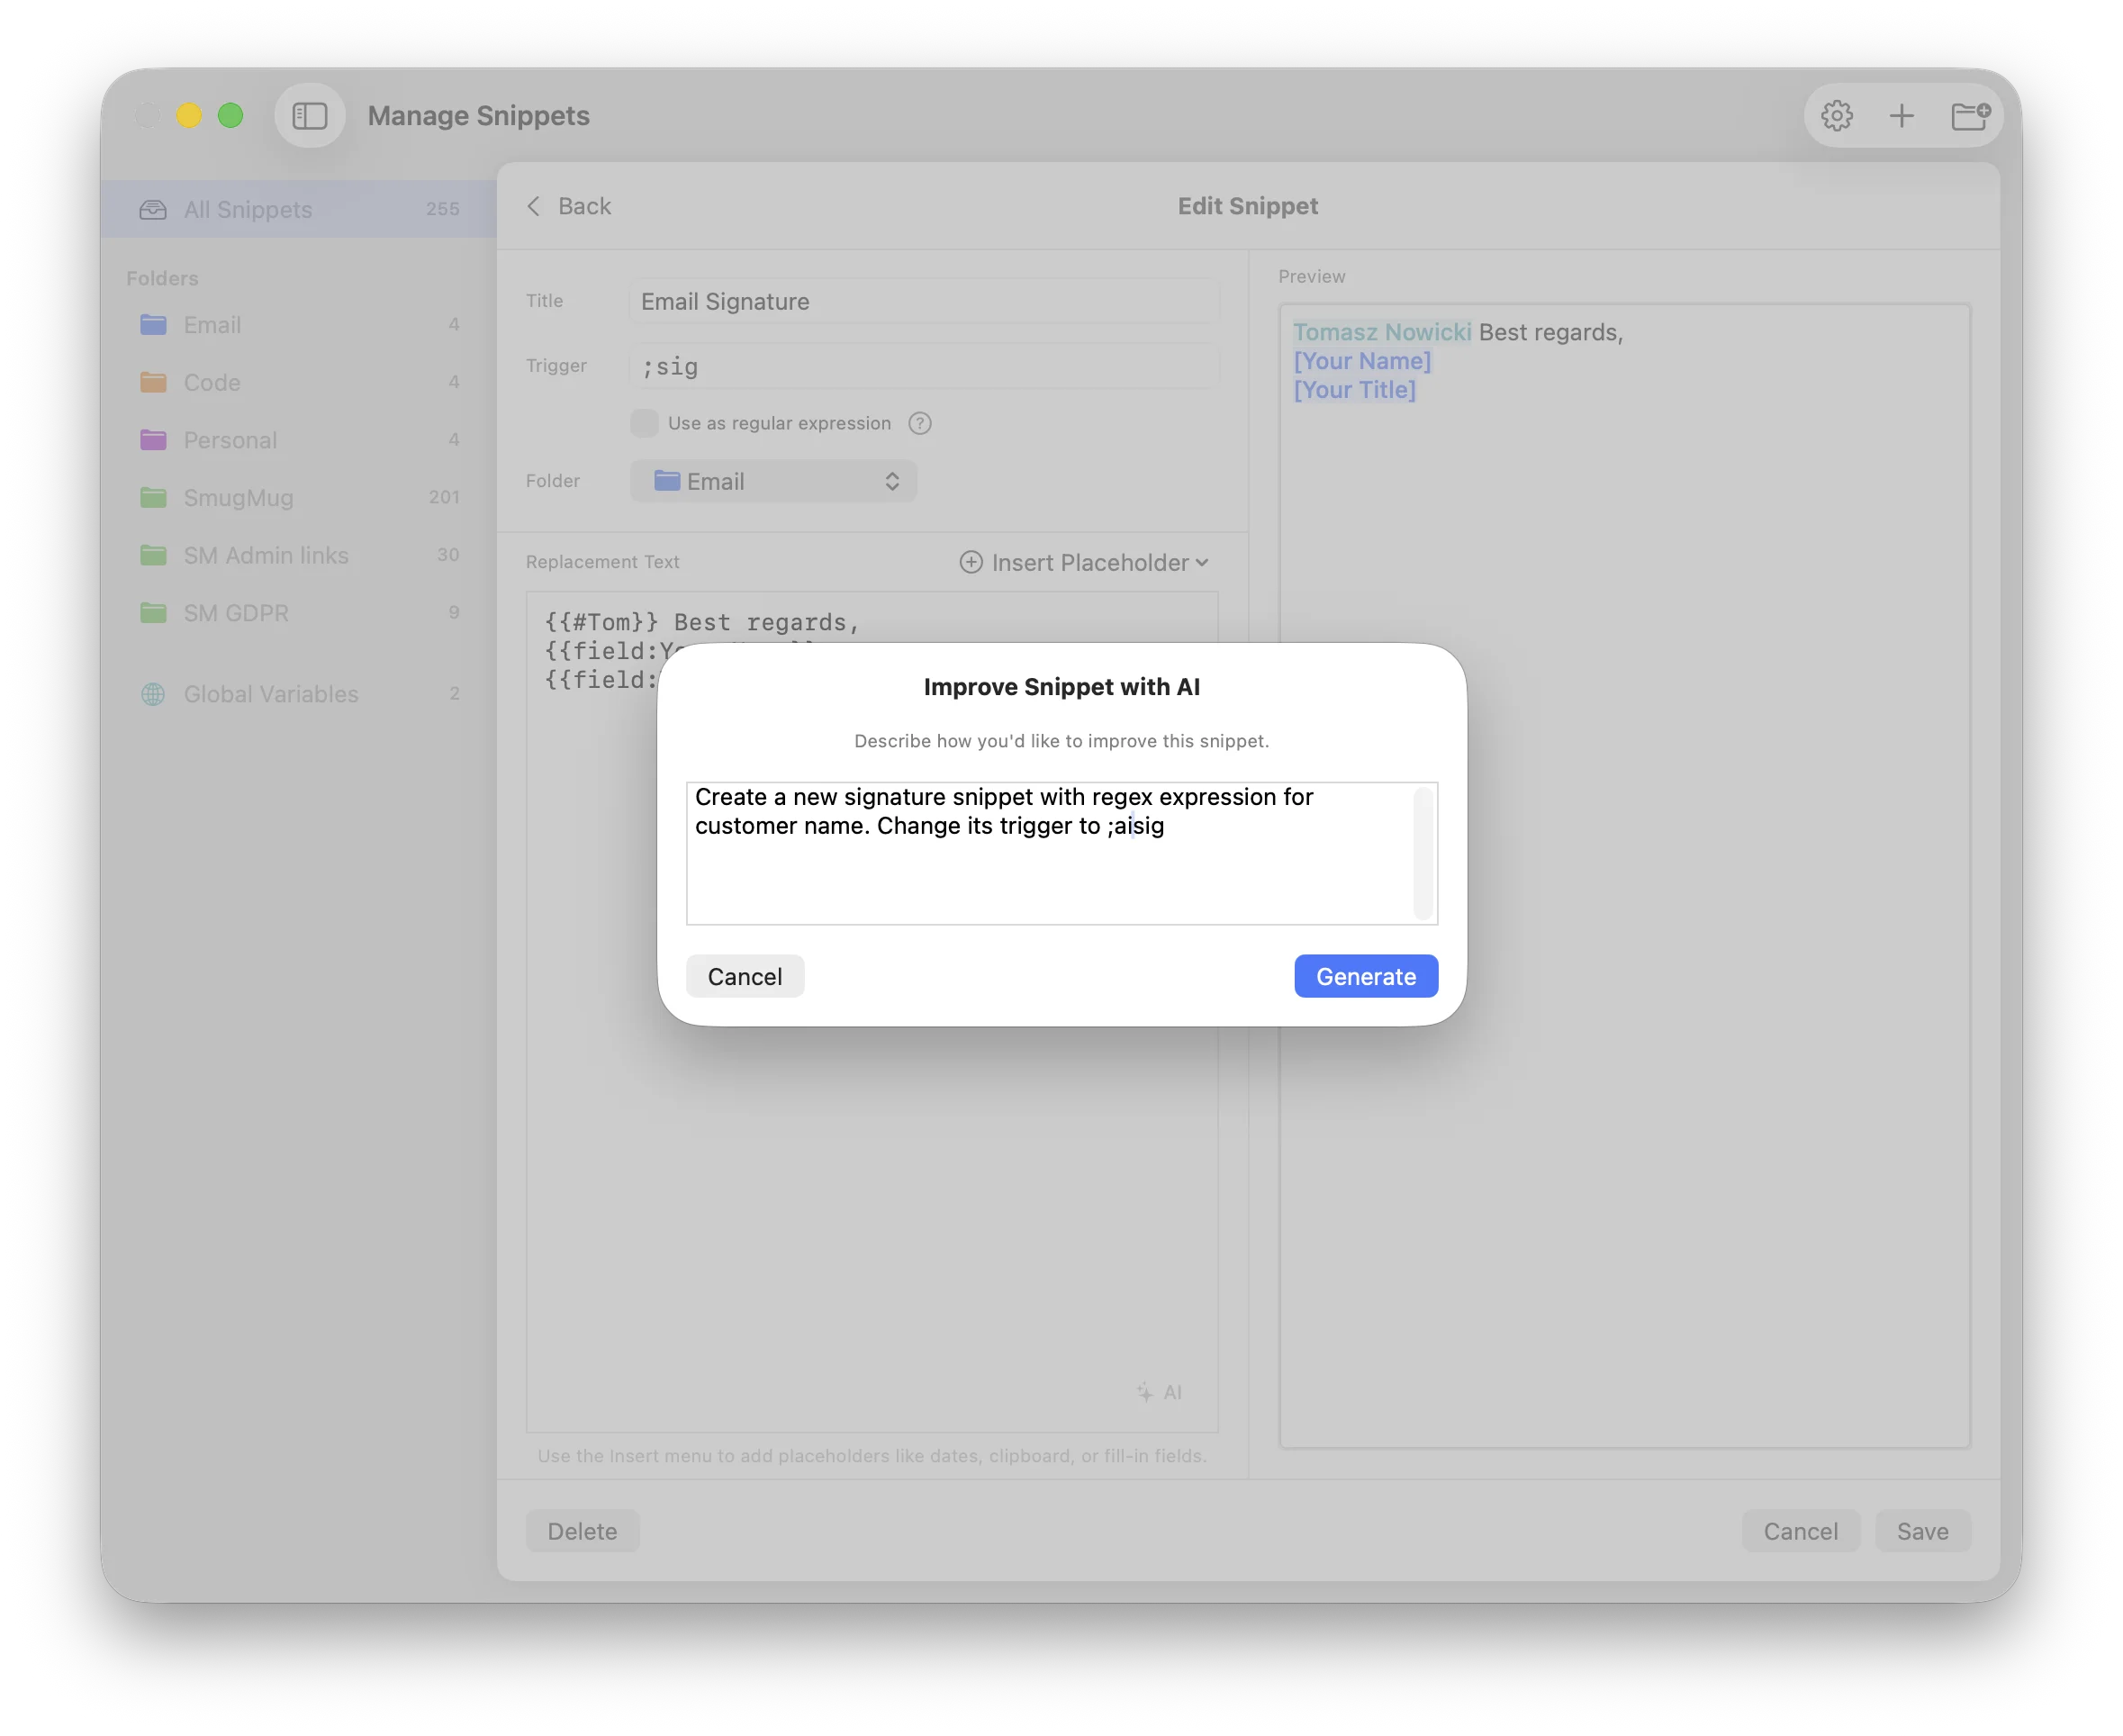
Improve with AI
Use this to enhance an existing snippet — the AI sees the current title, trigger, and replacement and suggests improvements.
- Open a snippet that has content
- Click the wand button ("Improve with AI")
- Describe what you'd like to improve
- Review and apply, refine, or discard
Example improvement prompts
| Prompt | What happens |
|---|---|
| "Add a fill-in field for the recipient name" | Adds {{field:Recipient}} where appropriate |
| "Make the greeting optional" | Wraps the greeting in {{?:Include Greeting}}...{{/?}} |
| "Use date math for next Friday" | Replaces hardcoded dates with {{date:+...}} |
| "Add cursor positioning after the greeting" | Adds {{cursor}} at the logical editing point |
| "Make the trigger shorter" | Suggests a more concise trigger |
| "Add a dropdown for tone: formal, casual, friendly" | Adds {{dropdown:Tone:Formal,Casual,Friendly}} and adjusts the text |
| "Replace the hardcoded company name with a fill-in field" | Swaps static text for {{field:Company:Acme Corp}} with a sensible default |
| "Add an auto-incrementing reference number" | Adds {{counter:ref}} to the snippet |
Tips
- Be specific: "Add a required dropdown for priority with options High, Medium, Low" works better than "add some options"
- You can specify placeholders: Tell Claude exactly which placeholder to use and where — e.g., "put
{{cursor}}after the signature" or "use{{date:+1d:long}}for the deadline" - Refine iteratively: Click Refine to go back and adjust your prompt if the first result isn't quite right. Claude remembers the previous suggestion and tries something different
- Regex triggers: You can ask for regex triggers — e.g., "create a regex trigger that captures a name from the trigger text"
- AI knows all placeholders: Claude is aware of every Wordy feature — dates, fill-ins, counters, JavaScript, shell commands, nested snippets, optional sections, and regex triggers
Privacy
- Your API key is stored in the macOS Keychain — it's never written to disk as plaintext
- Snippet content is sent to Anthropic's API only when you click Generate
- No data is stored on Anthropic's servers beyond the API request (see Anthropic's API data policy)
- Remove your API key at any time to fully disable AI features
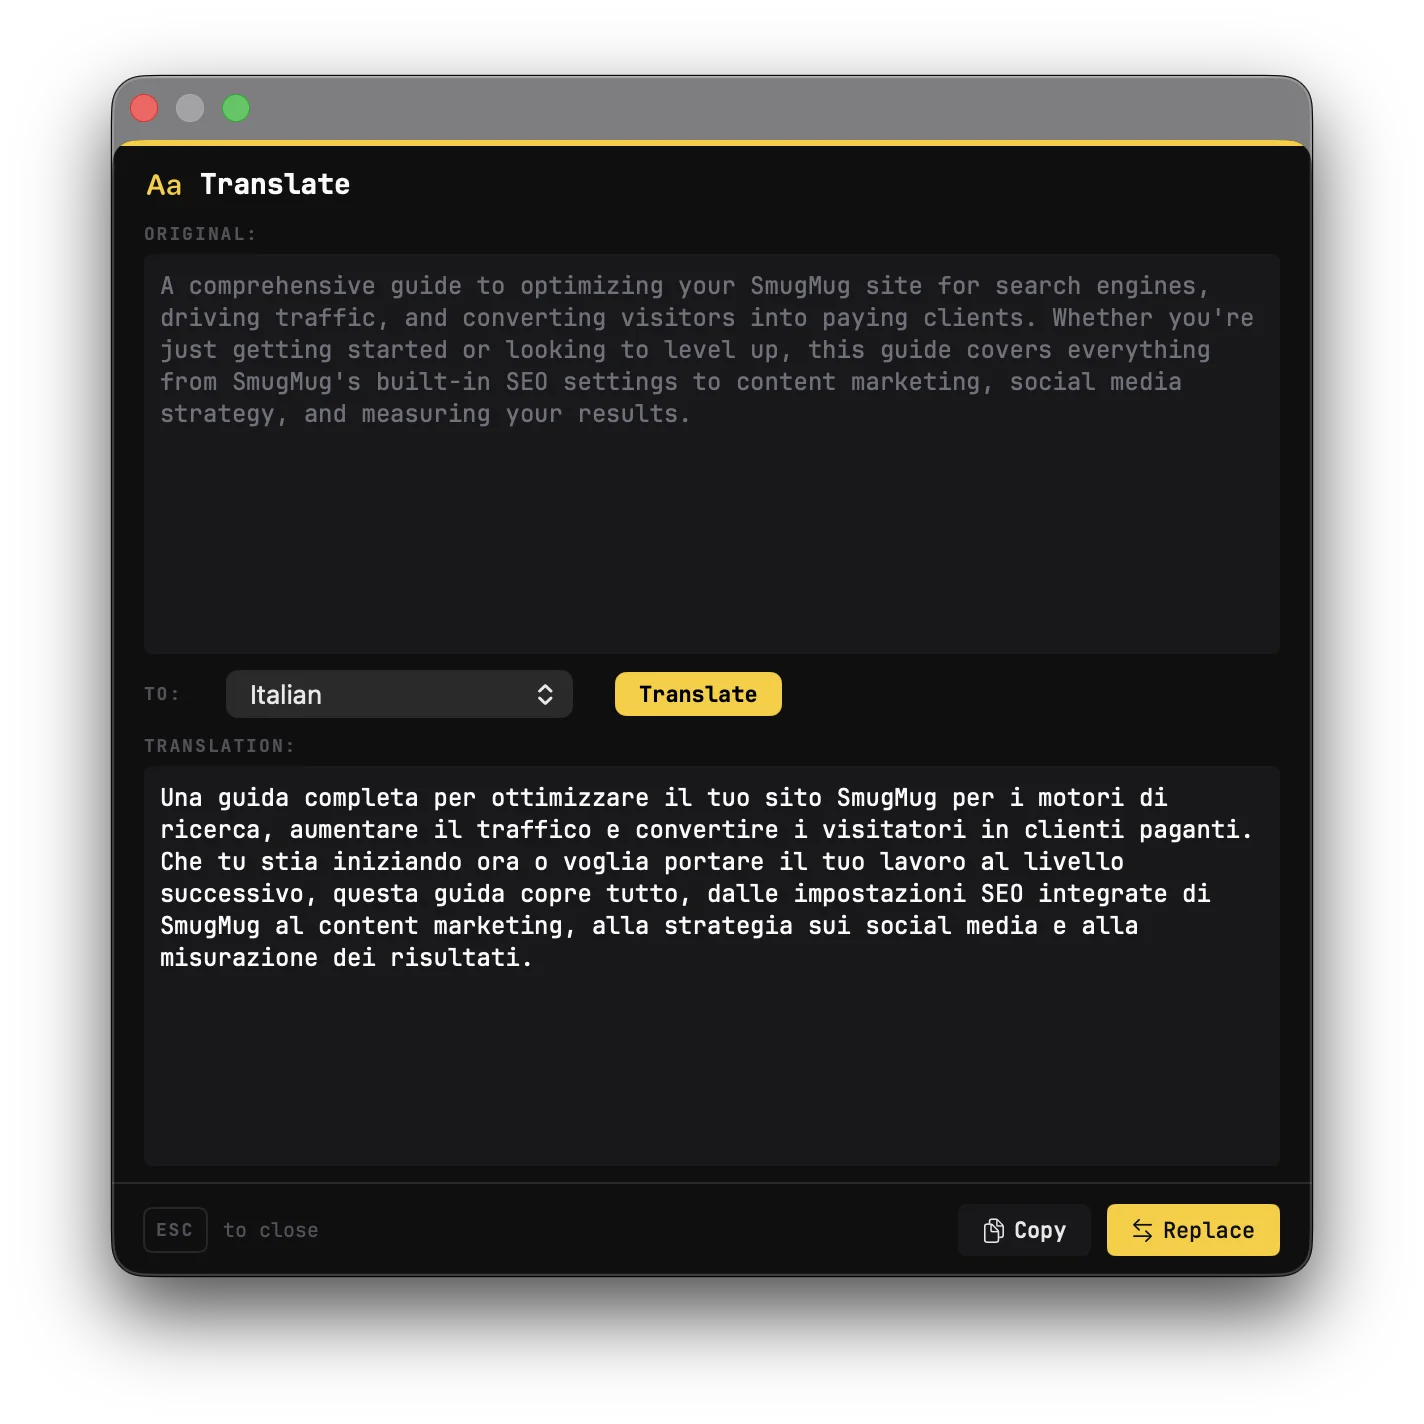
AI Translation
Translate selected text instantly from any app using Claude AI — without switching windows or opening a browser.
Setup
AI Translation uses the same Anthropic API key as AI Snippet Generation. If you've already set up your key in Settings → AI, translation is ready to use.
How to Translate
- Select text in any application
- Press ⌥T (Option+T) to open the translation panel
- Choose your target language from the dropdown (28 languages available)
- Click Translate (or press Return)
- Choose an action:
- Replace — Pastes the translation over your original selection
- Copy — Copies the translation to your clipboard
- Escape — Dismisses the panel without any changes
The Translation Panel
A floating Spotlight-style panel appears in the center of your screen showing:
- Original text — The text you selected (read-only)
- Language picker — Choose from 28 languages including Spanish, French, German, Japanese, Chinese, Korean, Arabic, and more
- Translate button — Starts the translation (also triggered by pressing Return)
- Translation result — The translated text appears here
- Replace / Copy buttons — Insert or copy the result
The panel auto-dismisses when you click outside it or press Escape.
Changing the Language
Select a different language from the dropdown and click Translate again. Your preferred language is remembered across sessions.
Customizing the Hotkey
The default shortcut is ⌥T (Option+T). To change it:
- Open Settings (⌘,)
- Find the Global Hotkeys section
- Click Record Shortcut next to "Translation"
- Press your preferred key combination
- Click Reset to Default to restore ⌥T
Requirements
- An Anthropic API key must be configured in Settings → AI
- If no API key is set, the translation hotkey is silently ignored
- Uses the same Claude model selected for AI Snippet Generation
Available Languages
Arabic, Chinese (Simplified), Chinese (Traditional), Czech, Danish, Dutch, English, Finnish, French, German, Greek, Hebrew, Hindi, Hungarian, Indonesian, Italian, Japanese, Korean, Norwegian, Polish, Portuguese, Romanian, Russian, Spanish, Swedish, Thai, Turkish, Ukrainian, Vietnamese.
AI Rewrite
Rewrite any selected text in any app using Claude. Fix grammar, change tone, simplify, or apply any custom instruction — all without leaving the app you're working in.
Setup
AI Rewrite uses the same Anthropic API key as AI Snippet Generation and AI Translation. If you've already set up your key in Settings → AI, rewriting is ready to use.
If you haven't configured a key yet, see AI Snippet Generation → Setup.
How to Rewrite
- Select the text you want to rewrite in any app
- Press Ctrl+Shift+R (or your custom hotkey)
- Type a custom instruction or pick a saved prompt from the dropdown
- Review the result in the panel
- Click Replace to paste the rewritten text back into the app, or Copy to copy it to your clipboard
The Rewrite Panel
The floating panel shows:
- The source app in the header (e.g., "Rewrite → Safari")
- Your original selected text
- A text field for your custom instruction
- A dropdown of saved prompts
- The rewritten result
The panel stays visible even if you click on another app — dismiss it with ESC or the close button.
Custom Prompts
Create and manage rewrite prompts that appear in the dropdown:
- Click the gear icon in the rewrite panel to open the prompt manager
- Add new prompts, edit existing ones, reorder them, or delete prompts you no longer need
- Prompts sync across devices via iCloud alongside your snippets and folders
Six presets are included out of the box:
- Fix Grammar — correct spelling and grammar
- Make Concise — shorten without losing meaning
- Make Professional — formal, business-appropriate tone
- Make Casual — relaxed, conversational tone
- Simplify — use simpler words and shorter sentences
- Summarize — condense into key points
All presets are fully editable — modify them to fit your needs.
Iterative Refinement
Not quite right? Click Refine after a rewrite to rewrite the result again with a different instruction. Chain multiple refinements without starting over — for example, first "Make Concise", then "Make Professional".
Customizing the Hotkey
The default shortcut is Ctrl+Shift+R. To change it:
- Open Settings (⌘,)
- Go to the Shortcuts section
- Click Record Shortcut next to "Rewrite"
- Press your preferred key combination
Requirements
- An Anthropic API key must be configured in Settings → AI
- If no API key is set, the rewrite hotkey is silently ignored
- Uses the same Claude model selected for AI Snippet Generation
- Text must be selected in the source app before triggering the hotkey
Import & Export
Importing from TextExpander
Wordy can import your TextExpander snippets:
- Export your snippets from TextExpander as CSV
- In Wordy, go to Settings → Import
- Select your CSV file
- Review the import preview:
- Choose a destination folder (or create a new one)
- Handle duplicates: Skip, Replace, or Import as new
- Review any conversion warnings
- Click Import
Automatic placeholder conversion
| TextExpander | Wordy |
|---|---|
%clipboard% | {{clipboard}} |
%filltext:name=X% | {{field:X}} |
%fillarea:name=X% | {{textarea:X}} |
%fillpopup:name=X:a:b:c% | {{dropdown:X:a,b,c}} |
%snippet:trigger% | {{snippet:trigger}} |
Undo Import
Changed your mind? Go to Settings → Recent Imports and click Undo next to the import batch.
Exporting Snippets
CSV Export (TextExpander compatible)
- Settings → Export as CSV
- Format: trigger, replacement, title
- Works with other text expanders
JSON Export (Full backup)
- Settings → Export as JSON
- Includes all snippets, folders, metadata
- Use for complete backups or migration
Snippet Version History
Wordy automatically saves a snapshot of your snippet each time you edit it, so you can recover previous versions if needed.
How It Works
- Every time you save a snippet, Wordy stores the previous version (title, trigger, replacement, and regex setting)
- Up to 5 versions are kept per snippet (oldest are pruned automatically)
- History is persisted across app restarts
Restoring a Previous Version
- Open a snippet in the editor
- Click the History button in the top-right corner
- Browse the list of previous versions (newest first)
- Each entry shows the date/time, trigger, and a preview of the replacement text
- Click Restore to load that version into the editor
- Review the restored content and click Save to keep it (or close without saving to discard)
Note: The History button appears dimmed if no previous versions exist for the selected snippet. Versions are only created when you edit an existing snippet, not when creating a new one.
Snippet Suggestions
Wordy can detect phrases you type repeatedly and suggest turning them into snippets — saving you even more time.
How It Works
- As you type, Wordy analyzes your typing patterns in the background
- When the same multi-word phrase (3+ words) appears 3 or more times, it becomes a suggestion
- The menu bar icon changes to a lightbulb to let you know suggestions are available
- Click Suggestions in the menu bar dropdown to view them
Viewing and Acting on Suggestions
The Suggestions sheet shows each detected phrase with:
- The repeated phrase
- How many times you've typed it
- A Create Snippet button to turn it into a snippet instantly
- A dismiss button (×) to remove suggestions you don't want
Clicking Create Snippet opens the snippet editor with:
- The phrase as the replacement text
- An auto-generated trigger (
;+ first letters of each word) - You can customize the trigger and title before saving
Settings
Toggle snippet suggestions on or off in Settings → General → Snippet suggestions.
Privacy & Performance
- Detection runs entirely in-memory — no typing data is saved to disk or sent anywhere
- Suggestions reset when you quit the app
- The detection runs in a separate, isolated process from snippet expansion — it cannot interfere with your typing or trigger detection
- Minimal memory footprint: stores up to 50 recent text segments and 500 phrase candidates
Settings
Access settings via the menu bar → Settings (or ⌘,).
General
| Setting | Description |
|---|---|
| Launch at login | Start Wordy automatically when your Mac boots |
| Hide dock icon | Keep Wordy out of your Dock (still accessible via menu bar) |
| Play sound on expansion | Audio feedback when snippets expand |
| Snippet suggestions | Detect repeated phrases and suggest creating snippets |
Updates
Wordy can automatically check for updates and notify you when a new version is available.
| Setting | Description |
|---|---|
| Check for updates automatically | When enabled, Wordy periodically checks for new versions |
| Check for Updates Now | Manually check if a newer version is available |
You can also check for updates from the menu bar → Check for Updates...
When an update is available, Wordy will show you the release notes and let you download and install the new version with one click.
iCloud Sync
Important: If you use Wordy on more than one Mac, update Wordy to version 1.4.0 or later on every Mac before turning on iCloud sync on a Mac that has not synced before.
Wordy 1.4.0 adds extra safety checks that can pause sync before a large number of snippets are removed. Older versions do not have this protection, so updating all Macs first is the safest path.
| Setting | Description |
|---|---|
| Sync snippets with iCloud | Keep snippets in sync across your Macs |
| Sync Now | Manually trigger a sync |
Synced data is stored in your iCloud Drive and visible in Finder.
If Wordy notices that an iCloud sync would remove many snippets at once, it pauses sync and shows a yellow warning in the menu bar. Open the warning to review the change before deciding what to do.
- Apply this sync if the incoming iCloud version is the one you want
- Reveal in Finder to inspect the saved copy before deciding
- Cancel to keep your current snippets and leave sync paused
Quick Search
Quick Search lets you find and expand any snippet instantly from any app, without needing to remember its trigger.
Overview
Press ⌥Space (Option+Space) from any application to open the Quick Search panel. A floating search bar appears in the center of your screen.
Using Quick Search
- Start typing to filter snippets by title or trigger
- Use ↑↓ arrow keys to navigate results
- Press Return to expand the selected snippet into the app you were working in
- Press Escape to close without expanding
The search ranks results by relevance: exact matches appear first, then prefix matches, then partial matches.
How Expansion Works
When you select a snippet:
- The Quick Search panel closes
- The app you were previously working in regains focus
- The snippet text is injected at your cursor position
- If the snippet has fill-in fields, the fill-in form appears as usual
Customizing the Hotkey
The default shortcut is ⌥Space. To change it:
- Open Settings (⌘,)
- Find the Quick Search section
- Click Record Shortcut and press your preferred key combination
- The shortcut must include at least one modifier key (⌘, ⌥, ⌃, or ⇧)
- Click Reset to Default to restore ⌥Space
Compatibility note: Quick Search requires macOS 14 (Sonoma) or later for full keyboard navigation. On macOS 13 (Ventura), filtering works but arrow key navigation and Escape within the panel are not supported—use your mouse to click a result or click outside to dismiss.
Keyboard Shortcuts
| Shortcut | Action |
|---|---|
| ⌥Space | Open Quick Search |
| ⌘⇧N | New snippet |
| ⌘, | Open Settings |
| ⌘⇧P | Pause/Resume expansion |
| ⌘Q | Quit Wordy |
| ⌘↩ | Save snippet (in editor) |
| ⎋ (Escape) | Cancel/close |
| ⌫ (Delete) | Delete selected snippet(s) |
Statistics
Track your productivity in Menu Bar → Statistics:

Lifetime Stats
- Total expansions
- Characters saved
- Time saved
- First expansion date
Last 7 Days
- Daily expansion chart
- Hourly usage distribution
- Top 5 most-used snippets
Pause/Resume
Need to type a trigger literally without expansion? Pause Wordy temporarily:
- Menu Bar → Pause Expansion
- Or press ⌘⇧P
Resume the same way when you're ready.
Secure Input Detection
macOS enables "secure input" mode when focus is in password fields, blocking keyboard monitoring for security. Wordy detects this and provides visual feedback so you know when expansions are temporarily unavailable.
How it works
- Menu bar icon changes to a lock icon when secure input is active
- Dropdown menu shows "Blocked by [AppName]" to identify which app enabled secure input
- Uses
ioregcommand to readkCGSSessionSecureInputPIDfrom I/O Registry, then resolves to app name - Falls back to frontmost app if I/O Registry doesn't provide the PID
- Automatic detection — Wordy checks every 0.5 seconds while running
Note: There's a known macOS bug where if an app enables secure input while in the background, the reported PID may be wrong. For the typical case (clicking in a password field), it works correctly.
When does secure input activate?
Secure input is typically enabled when you're typing in:
- Password fields in browsers and apps
- Keychain and security dialogs
- Some banking and payment apps
- Any field marked as secure by the app developer
This is a macOS security feature—Wordy automatically resumes normal operation once you leave the secure field.
Troubleshooting
Snippets not expanding
- Check accessibility permission: System Settings → Privacy & Security → Accessibility → Wordy (enabled)
- Check if paused: Look for "Resume Expansion" in the menu bar menu
- Test in different apps: Some apps handle input differently
Fill-in form not appearing
- Ensure your snippet contains fill-in placeholders (
{{field:...}},{{textarea:...}},{{dropdown:...}},{{datepicker:...}},{{?:...}}, or{{note:...}}) - The form only appears when there are fields to fill (or notes to display)
iCloud not syncing
- Ensure you're signed into iCloud on your Mac
- Check that iCloud Drive is enabled
- Try Sync Now in Settings
- Check the sync status indicator for errors
Sync paused warning
If Wordy shows a yellow warning in the menu bar, it means iCloud sync was paused because the incoming sync data would remove a large number of snippets.
- Choose Apply this sync only if the incoming iCloud version is the version you want to keep
- Choose Reveal in Finder if you want to inspect the saved copy first
- Choose Cancel if you want to keep your current snippets
iCloud unavailable warning
If Wordy cannot reach iCloud for several minutes after launch, macOS may show a notification that sync is paused. Check your internet connection, iCloud Drive status, and available iCloud storage. Wordy will try again the next time it launches.
Global variable shows [#Name?]
This means the variable isn't defined:
- Open the Global Variables window from the sidebar
- Check if the variable exists (use search to find it)
- Verify the spelling matches exactly (names are case-insensitive)
- Create the variable if it doesn't exist
Data Storage
Local data: ~/Library/Application Support/Wordy/
iCloud data (if enabled): ~/Library/Mobile Documents/com~apple~CloudDocs/Wordy/
Your snippets are stored as JSON files and can be backed up manually if needed.
Automatic backups: Wordy keeps recent local backups in ~/Library/Application Support/Wordy/Backups/. If you need to restore one, quit Wordy, open the backup folder in Finder, copy the backup contents over your current Wordy data folder, then relaunch Wordy.
iCloud snapshots: When iCloud sync is enabled, Wordy also keeps recent snapshots before uploading new sync data. These give you another recovery point if synced data changes unexpectedly.
System Requirements
- macOS 13.0 (Ventura) or later
- Accessibility permission (required)
- iCloud account (optional, for sync)